The name may be misleading, as chia pudding consists of gelled chia seeds that expand about 2-3x their normal size after absorbing liquids. The seeds remain whole but do soften. They also have a particularly fascinating ability to attract one another and tend to bead together on the back of a spoon, say, a bit like water droplets. You’ll see what I mean when you make this.
No dairy is involved in this pudding. Of course, unless you chose to add it. If you replace the non-dairy milk with dairy milk, I’d recommend omitting leaving the pudding on the counter for an hour to set. Give it a good whisk and stick it straight in the fridge. During the first hour of setting time, pull it out intermittently, stirring to discourage clumping and adding more milk if liquid is needed, about a tablespoon or two at a time.
Breakfast sans Sugar Rush
Store-bought granola typically contains high amounts of sugar — be it high fructose corn syrup, pure cane, or molasses. Being sensitive to processed sugar (it’s a migraine trigger for me hooray) I’ve begun to pay particularly close attention to what I eat first thing in the morning. This may be personal, but I believe what I eat for breakfast stays with me all day. It can affect my mood, energy levels and how I feel physically.
That being said, this granola gains its sweetness from small amounts of honey, fruit jam and dried berries (such as cranberry or raisin). Customization is always encouraged, but for the cleanest breakfast, I’d recommend following the recipe as written. Together with some fresh fruit, this Chia Pudding & Granola Parfait becomes an enjoyably sweet breakfast without inviting a massive carb-loaded sugar crash mid-morning.
As always, feel free to add your own twist and enjoy!
Chia Pudding and Granola Parfait
Make this recipe on a Sunday evening and enjoy throughout the week as a delicious, low sugar breakfast!
½cupcrushed nutspecans, almonds, walnuts or peanuts
2tspcinnamon
2TBagave or brown sugar
2TBjam of choice
¼cupdried berriescranberry, raisin or blueberry
Instructions
Preheat oven to 350°F.
Whisk coconut milk, non-dairy milk, ginger, vanilla and sweetener of choice in a large bowl. Once smooth, add in chia seeds and mix well.
Let chia pudding sit on counter for about an hour, whisking intermittently and adding liquid as needed. This helps the chia seeds to expand without clumping together. While chia pudding sets, prepare the granola.
Mix all granola ingredients in a large bowl. Cover a sheet pan with parchment paper and press granola into pan.
Bake granola for 20 minutes, until crisp.
Let granola cool on the counter. Once cool, store in an airtight jar on the counter.
Store chia pudding in an airtight container in the refrigerator.
To serve, spoon chia pudding into a bowl. Add chopped fruit, peanut butter or preserves and top with granola. Enjoy!
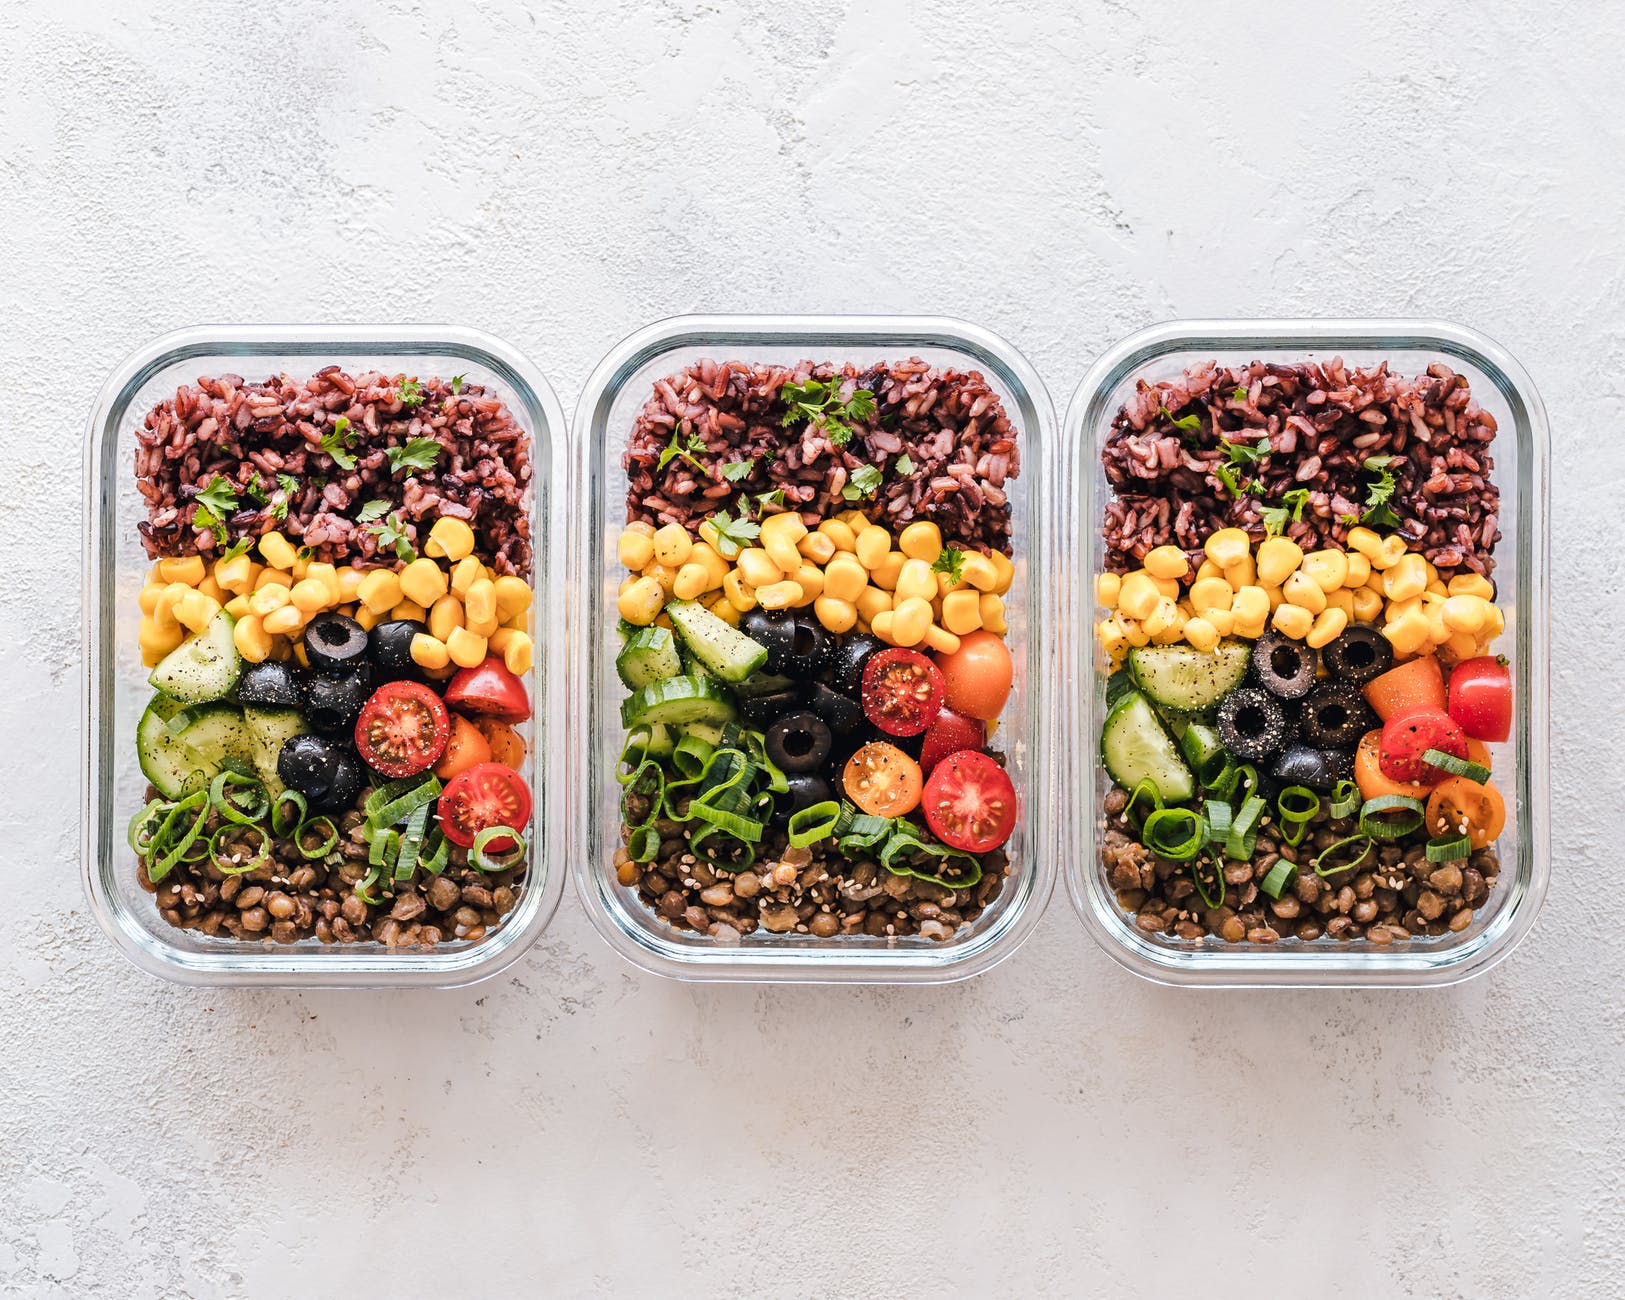
If you’ve been following me on Instagramfor a while, I’m sure you’ve seen examples of some meal preps we prepare during the weekends. Meal prep is growing in popularity as a method of saving money on going out, maintaining a healthy diet, or just being able to enjoy a home-cooked meal without actually having to cook the entire meal every night.
The intention of this article to shed some light on two things:
1. What is Meal Prep.
2. Why it’s appealing.
It’s Meal Prep 101!
If you aren’t into it, I promise I won’t be upset.
One of the reasons I advocate meal prep is because you can make it be whatever you want/need it to be.
Do what works for you — but don’t be afraid to try something new!
(And if what works for you is to not meal prep at all, skip this post and check out my recipe page or local dining reviews instead!)
So let’s get into it. What is meal prep, really?
THE SHORT VERSION
Meal prep is preparing your meals ahead, storing them safely in the fridge and simply reheating them before consuming. If you prepare your meals ahead of time, or even the majority of your meal, you are meal prepping!
You can prepare a weekday’s worth of breakfasts, lunches and dinners ahead of time. It can be the same meal every day for five days, or a variety.
THE LONG VERSION
Here’s an example menu, three meals a day for five days.
M-F BREAKFAST
Bacon and Egg Cups
M-F LUNCH
Orange Chicken and Vegetable Fried Rice
M-F DINNER
Spinach & Kale Salad
These are all items I’ve made and prepped for the week. I chose them because they contain ingredients and flavors that I enjoy, and because they are ~relatively~ easy to make in large batches.
Alternatively, meal prep can look like cooking a batch of chicken breast and ground beef and utilizing the cooked meat to create a variety of meals throughout the week. Meal prepping this way saves cooking time and allows you to throw together delicious, homemade meals in minutes.
An example (using cooked chicken breast and ground beef for two meals a day for three days):
DAY 1
Lunch: Chicken Salad Sandwich
Dinner: Beef Burrito Bowl
DAY 2
Lunch: Beef Street Tacos
Dinner: Grilled Chicken Caesar
DAY 3
Lunch: Hamburger Lettuce Wraps
Dinner: Chicken, Roasted Potatoes and Cheesy Broccoli
You can swap any ingredients out for meal prep. Instead of a big batch of ground beef, maybe you do a big batch of fried tofu! It’s 100% customizable. Start small and see how it goes, or jump in with both feet like we did!
What does meal prep look like in my life?
My husband and I work full-time. We have commitments on the majority of weeknights, and like to get out into the community going to local restaurants and events. Needless to say, our weekdays don’t allow much time for making dinner after work, or prepping lunches for the next day. Generally, we pack as much into our weekends as possible, because we want to enjoy our time off! Saturday mornings, we wake up, have a nice cup of coffee, read the Bible then get right into meal prep. This is what works for us. We like being able to prepare for the week ahead first thing Saturday morning, and have the rest of the weekend to simply enjoy living life!
You DO NOT have to meal prep that way. The most important part of meal prep is finding what works for YOU. Otherwise, you won’t be consistent about it. Whether that means carving out a few hours on a Sunday afternoon, or prepping for only three days at a time, find what works for you and run with it.
CONFESSION: When we first started meal prepping, I hated it. It was frustrating and difficult to plan out a week’s worth of breakfast, lunch and dinner and make it all in our tiny kitchen. Being newlywed, I wanted nothing more than to lay on the couch and Netflix after months of wedding planning!
Despite my discontent, I increasingly appreciated being able to come home from work and have dinner ready, just needing to be reheated before eating. I didn’t have a mound of dishes in the sink, only our meal prep containers and plates to rinse and throw in the dishwasher.
Frequently Asked Questions
Q: Don’t you get tired of having the same thing every day?
A: The honest answer is… sometimes! When we make something I don’t like that much, or that didn’t turn out as I had expected, it gets tiresome to eat it day after day.
But when we make dishes I truly enjoy eating, that are filling and tasty and cooked to my preference, I do not tire of eating it throughout the week. Make no mistake — I greatly look forward to the weekends, but I’d much prefer eating the same dinner five days a week without the stress of whipping up a healthy meal after a full work day. Chicken Enchiladas and the Lemon Miso Pork with Coconut Curry Vegetables were two meal preps I 100% looked forward to eating every single day. As I said before, it’s imperative to find what works for you and to start with flavors and dishes you already know you love!
Q: Can you ever eat out? Aren’t you committed to eating what you prep?
A: Yes you can eat out and no, you aren’t obligated to eat what you prep for every meal. The flexibility of your meal prep depends on your own personal preference. I’d rather make meals for the week and have that option. When plans change, or the opportunity arises to eat out, or with friends/family, it is simple enough to put the planned, prepped meal into the freezer to eat at a later date. By doing this, you’ll eventually build up enough meals to eat for a week without prepping! Believe me, it happens faster than you’d think.
Q: Does all of your prep really keep for five days?
A: It depends. Some ingredients hold up much better than others. An easy way to think about it: any food that would hold up to a trip to the beach, or a picnic is a great candidate for meal prep. There are also ways to preserve your food, like dressing salads only right before you eat them. Foods that, once cooked, get mushy or undesirable in a day are not recommended for meal prep — my number one example: zucchini! Additionally, if you are concerned about the freshness of your food, you can prep for three days a time only, instead of the full five. Ultimately, start small to learn what you are comfortable with. We’ve prepped this way for over a year and have never had issues with food going bad. There were some things that just weren’t tasty after a day, but those were experimental and things we won’t do again. Okay, so it was the one time I tried making roasted radishes. The internet made it look tasty but I do not recommend. Ever.
That leads to the next main question…
Why Meal Prep?
Have complete control over what ingredients go into the food you are eating.
Whether it is for a weight-loss diet, for overall healthy body function, or for food sensitivities (for me, it’s no diary). Meal prep affords you the opportunity to know exactly what is going into your food, and to modify as you desire. You get meals catered to your tastes and necessities without the labor of preparing the meal from start to finish every time you are hungry!
Meal time convenience.
With your meals already prepared, no thought is required when meal time comes. Heat up your meal (or not, if its a no-reheat meal like salad or a fun bento box) and you are ready to eat. By having a homemade, prepared option, you’re less likely to eat out, grab fast food, or even substitute a granola bar for dinner (no shame intended, but you are worth more than a granola bar!).
Saves money.
Buying groceries in bulk and preparing your own food undoubtedly saves you money, particularly if you shop what’s on sale and in season in the grocery store. Saving money on weekday cooking means more funds for weekend fun! Personally, I’d rather save during the week and go somewhere special on the weekends. Or stash the money we’ve saved for a vacation! (Italy, anyone?)
Less dishes throughout the week/on days with prepped meals.
Need I say more? Typically, I deep clean my kitchen once a week, after we’ve completed prep. All it needs is simple maintenance throughout the week to stay clean and organized!
Improve your cooking skills.
Tackle basics you’ve been wanting to learn or branch out and try something new! Additionally, meal prep will improve your budgeting and planning skills, a completely unanticipated but warmly welcomed side effect of meal prep I discovered a few months into it!
100% customizable.
It’s YOUR meal prep… make what you want to eat! Whether it’s low carb, vegan, high protein, all greens, you name it, you can prep it. There are some incredible resources available to assist with your meal prepping journey. You can choose to have meal plans created for you to follow, use a meal-planning service like Blue Apron, or do it all on your own. It’s up to YOU.
Intrigued by meal prep or have other questions? Please feel free to contact me! I’d love your input on this article series. Next, I’ll be covering the basics for planning meal prep.
Until then, I recommend starting with something simple and versatile, like my Spring Harvest Rice recipe. It’s great to have in the fridge throughout the week as a starting point for a healthy, satisfying lunch or dinner. Good luck with prep, and as always… Enjoy!
Of course, that’s the point! Make this recipe on a Sunday and snack on this delicious rice throughout the week.
This is a meal prep recipe that can easily be adapted to supplement different proteins and side dishes throughout the week, or to be used as is for a delicious and healthy meal prep lunch!
It’s flavor profile is flexible and truly can be made into a side dish or entree with anything. Similar to Spanish Rice, Spring Harvest Rice uses fresh tomatoes and a plethora of vegetables and spices.
See the recipe notes below for three ideas to turn this star side dish into the main event.
Make as is and this will yield about 10 cups of nutrient-rich rice.
INGREDIENTS
6 cups cooked white or brown rice (3 cups uncooked).
3 tablespoons Oil (Extra Virgin Olive Oil or Sunflower Oil).
1 green bell pepper, diced.
1 yellow onion, diced.
1 tablespoon salt.
3 cloves garlic, minced.
4 cups fresh tomato, diced (substitute: canned).
1/2 red bell pepper, diced.
1 lb frozen peas.
1 tsp Herbs de Provence (substitute: 1/2 tsp oregano and 1/2 tsp basil).
1 tsp black pepper.
1 tsp parsley, dried.
1 tsp onion powder.
1 tsp garlic powder.
1 tsp smoked paprika.
1/4 tsp cumin.
DIRECTIONS
1. First, cook your rice. I prefer cooking rice in my Instant Pot, but you are welcome to use any method you like, including microwaved steamed rice! For this recipe, make sure it’s unseasoned rice. Brown or white is fine. You can also substitute couscous, farro or barley (cook according to package directions).
2. In a large pot, heat the 3 Tablespoons oil. Add diced onion, garlic, red and green bell peppers. Sauté until tender, about 10 minutes.
3. Add tomatoes. Simmer uncovered over medium heat about 30-40 minutes, until tomatoes are cooked down and there is minimal liquid left in pot. Simply put, it should look less like tomato sauce and more like a big pot of sautéed vegetables.
4. Add all the spices and mix well to incorporate. Turn the heat from medium high to medium and add the bag of frozen peas. Mix to incorporate and defrost the peas.
5. Add the rice 1-2 cups at a time, mixing well to incorporate. Be sure to break up the chunks of rice to blend with the vegetables. Repeat the process until all of the cooked rice is added to the vegetables. Complete!
SPRING HARVEST RICE THREE WAYS:
1. Serve with shredded rotisserie chicken for an easy weeknight dinner.
2. Wrap rice with black or refried beans in a flour tortilla topped with shredded cheese for an easy vegetarian burrito.
3. Fry up a few cups of rice in a hot oiled pan. Add two to three scrambled eggs. Serve as vegetable fried rice alongside cooked steak.